For purchases that include frame matting ordered through our easy frame designer, we cut mat openings around the “Art Size” that you enter (keeping it uniform on all sides) and expand the frame to make the extra space needed for the matboard — this eliminates the need for you to have to do any sort of math, which helps keep things, well, easy.
In most cases, you shouldn’t need to worry about ordering separate matting for your fame.
Sometimes, though, having your frame configured this way might not work for the look you’re trying to achieve. For example:
- you may want/need the outer frame dimensions to be a certain size or ratio (ex: you want your frame to be square, but your art is rectangular)
- you want different size matting on the top and bottom vs. the sides
- you might want a circular mat opening
- you may want to frame an item smaller than 5″ X 5″
In all of these instances, it would be easier — or even necessary — to order your matting separately from your frame.
But don’t worry — we make this easy for you to do! We’ll walk you through the basic steps, as well as give some useful tips along the way.
Different Looks To Achieve

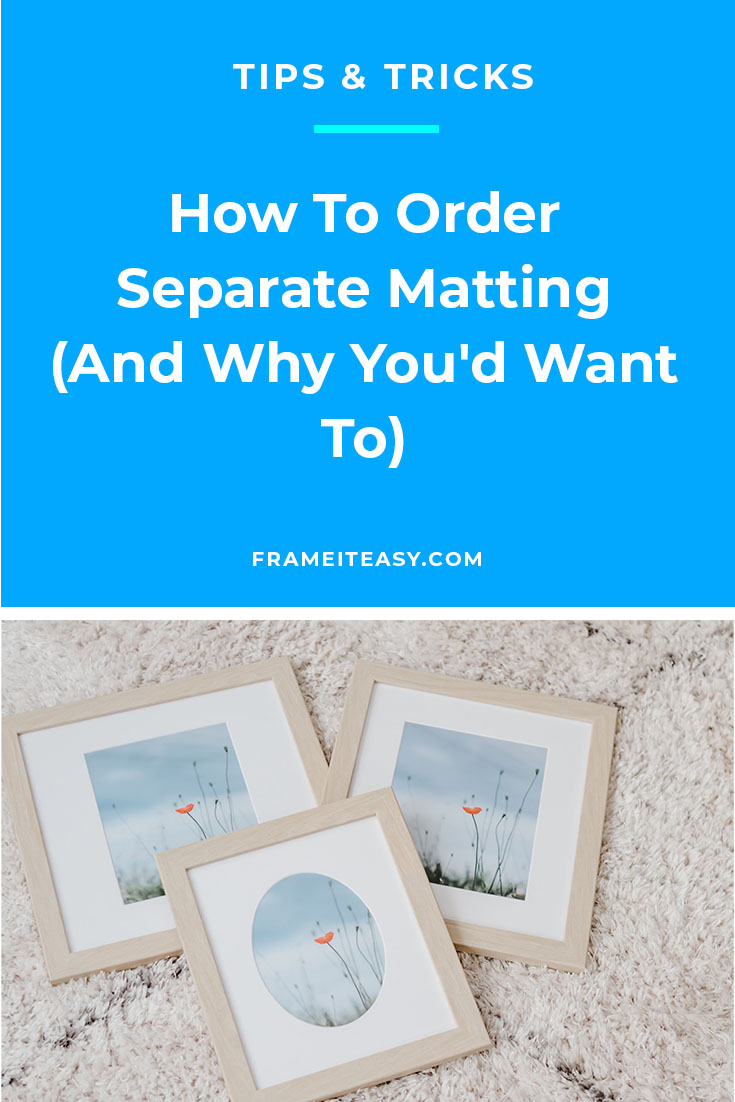
First things first, as we mentioned there may be different looks you want to achieve which is why you need to order separate matting in the first place.
All three examples above have the exact same size art inside, but you can see how frame matting can make a big difference in the overall look and size of the frame.
Below we’ll walk through a few scenarios in which ordering separate matting would be best, and then we’ll explain how to actually order.
Outer Frame Dimensions of A Certain Ratio – Order Separate Matting

Let’s say you have a piece of art that is 8″ X 10″ but you want your overall frame to be square or a 1:1 ratio.
In this case, you would order separate matting so you can specify both the inner and outer dimensions.
For the frame above, the inner mat dimensions are 7 1/2″ X 9 1/2″ and the outer mat dimensions are 14″ X 14″.
Circular / Oval Matting – Order Separate Matting

If you’re looking for an opening to your matting that is a circle or oval, you would do so by ordering separate matting and choosing “Oval” for the opening shape.
For the frame above — with the same 8″ X 10″ piece of art, the inner dimensions of the matting are 6″ X 8″ and the outer dimensions are 10″ X 12″ with an Oval opening shape.
Framing Art Smaller than 5″ X 5″ – Order Separate Matting

If you have a piece of art that is smaller than 5″ X 5″ you would need to add extra matting (as 5″ X 5″ is the smallest frame size we can safely cut.)
To do this, you can follow our separate tutorial on framing small art.
Same Size Matting On All Sides – No Need to Order Separate Matting

If you simply want “standard” matting that is the same size on all sides, there is no need to order separate matting. You can easily use our frame designer to design your frame and choose matting options in Step 3.
The big advantage of frame matting here is that you also have the option to upload a digital photo for us to print and frame, making for a ready-to-hang solution. If you order separate matting, it’s best to have your art already in-hand, so a little assembly will be required.
For the frame above, the art size is 8″ X 10″ with 2″ of matting.
How To Design Your Matboard Separately

If you’ve determined you need to order separate matting for your project, you can do so from our “Matboard” page.
This specific page on our site allows you to determine the exact outside and inside measurements of your matboard.
(BONUS: As we mentioned, you are also able to choose an oval-shaped frame matting opening, where this isn’t offered directly on the homepage.)
When choosing the opening for your matboard, you’ll need to enter both the “Outside Width and Height” and “Inside Width and Height” as the numbers of your choosing; the only restriction would be that the “Outside Width and Height” would need to be at least two inches greater than the “Inside Width and Height”.
For example, if your “Inside Width and Height” is 8″ X 10,” then the “Outside Width and Height” of your mat would need to be at least 10″ X 12″.
Pro tip: On our home page, we automatically put the 1/4″ overlap into all our frames and matboards by removing 1/2″ from both the “Width” and “Height” of the “Art Size” that you enter.
On our “Matboard” page, however, this is not done; everything will be cut exactly to the numbers that you enter. So if you want a 1/4″ overlap (which we highly recommend), you’ll have to remove 1/2″ from both the “Inside Width” and “Inside Height”. For example, if your art size measures 8″ X 10,” you’d want to enter 7 1/2″ and 9 1/2″ as the inside width and height to account for 1/4″ overlap.
If you would like to omit the overlap entirely (not recommended), then just enter the dimensions with no subtraction.
Your Outside dimensions will then be what you use for the “Art Size” of your frame through the regular frame designer.
Once you’ve set all your measurements — and choose the color — add it to your shopping cart.
How To Order Double Matting

First, let’s go over how double mats work on our site: They’re just two separate matboards with different inner dimensions so that you get a “double” accent for your image. Typically, the “inner mat” has a smaller visible area than the “outer mat”.
So, to make the double matting from our “Matboard” page, it would require you to make two individual items — one with a larger opening to be the outer mat, and one with a smaller opening to be the inner.
Pro Tip: If you want a certain amount of inner mat showing, you would add double that amount to the measurements of your outer mat opening.
For instance, if you wanted 1/4″ of your inner mat showing, you would make the “Inside Width” and “Inside Height,” respectively, of your outer mat 1/2″ larger.
If your inner mat had an opening of 8″ X 10″, and you wanted 1/4″ of that showing, you would make the opening of your outer matboard 8 1/2″ X 10 1/2″. If you wanted only 1/8″ of inner matting showing, you would make the opening of your outer matboard 1/4″ larger — making the measurements 8 1/4″ X 10 1/4″, for an 8″ X 10″ inner mat. This same concept would apply to any other amount, too.
Design Your Frame
Once you have your desired matting in your cart, head on back to our frame designer. You’re now all set to design your frame!
There are only a few steps you need to take in order to make your framework. First, you would need to set your “Art Size” to the exact same numbers as the “Outside Width and Height” of the matboard you just made. So, if your matboard had an “Outside Width and Height” of 10″ X 12″, your frame’s “Art Size” would be those same numbers. That way, everything will fit perfectly!
(When you’re at the “Matting” section in Step 3, be sure to select “No Mat,” as it’s already waiting in your cart!)
Choose any style frame and which cover style you want, and you’re good to place your order.
Matting It All Out

Unique matting can change your entire piece and set the tone for your project. You can choose a colored matboard that complements a certain color in your picture to make the whole piece really pop. Or, you can simply choose a white mat and make the whole piece look simple and clean.
Let’s review the steps for you to make the perfect matted display for your piece:
- If you’re trying to achieve a specific look, create a matboard separately on the matboard page of our site.
- Set your matboard’s “Outside Width and Height” to be the size you would like your overall frame. Set the “Inside Width and Height” to fit the measurements of your art.
- Add the matboard to your cart.
- Go to the home page and select the same “Art size” as the “Outside Width and Height” of your matboard. (Make sure that you select “No Mat” when you get to section 3 of the frame designer.)
- Assemble and hang your piece once you receive it for all to enjoy!
And that is everything you need to know about frame matting! Don’t forget to have fun when designing your frame and matting choice. Your picture is a work of art, and your frame should display that. If you have any more questions check out our answers page, or reach out to our support team who is always ready to answer your questions!